
![]()
Based on Dreamer's Visualboy Advance skinning tutorial (with permission).
Note: In this tutorial Photoshop software is used to create the image!
![]()
Section 1 : The Bitmap
![]() Step 1.
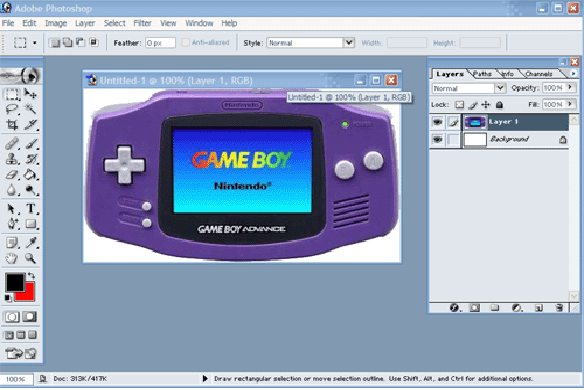
Step 1.
Select or make an image that you want to use for the skin. Leave some space in
the image so you have your screen where the game will be played. It is
recommended that you keep this an integer of the actual native screen size which
is 240x160.
![]() Step 2:
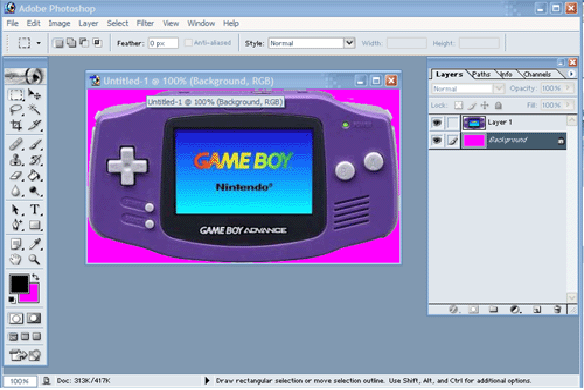
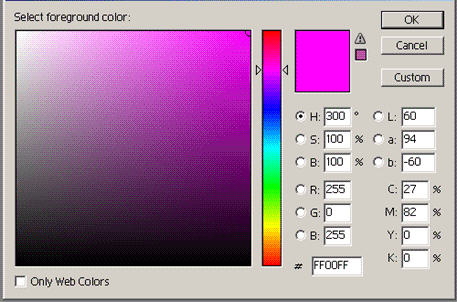
Step 2:
Change the images background colour so that it can be traced easier. Use a
completely different colour from that of the image, and take note of the RGB
value of the colour used! You will need it later on!
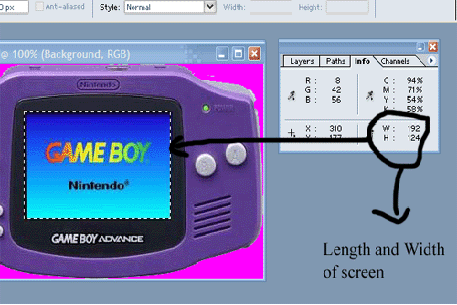
![]() Step 3:
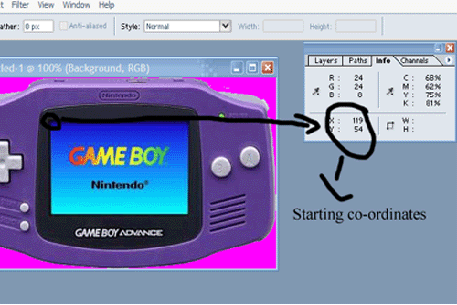
Step 3:
Select the exact pixel that the screen is going to start, mark down the X and Y
co-ordinates, you will need it for the INI file.
Remember, to avoid distortion keep the screen at an integer of the native
resolution...
Gameboy Advance = 240 x 160
Gameboy Colour/Mono = 160 x 144
Gameboy Colour/Mono with border = 256 x 224
![]() Step 4:
Step 4:
Now select the entire screen region with the select tool to get the width
and height, again, mark these down; you will need them for the INI file!
![]() Step 5:
Step 5:
Now you are finished with the bitmap! Save it as a Windows bitmap and exit the
software.
![]()
Section 2 : The RGN File
![]() Step 6:
Step 6:
Copy or move the bitmap you have created to the Regioncreator software folder.
![]() Step 7:
Step 7:
Open up a command prompt and navigate to that folder.
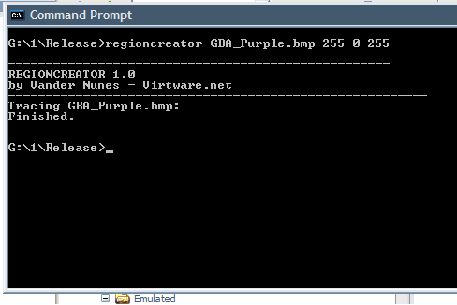
![]() Step 8:
Step 8:
Now type the following at the command prompt...
regioncreator.exe FILENAME.bmp RED GREEN BLUE
For example, if your bitmap is named gba.bmp and the image background colour (the part that you want to be transparent) RGB value is 153 123 241, then you would type...
regioncreator.exe gba.bmp 153 123 241
Then wait for the program to trace the bitmap and create the .RGN file.
![]() Step 9:
Step 9:
Now your region file and bitmap are complete, move them BOTH to wherever you
want to keep your skin.
You should so far have 2 files, your bitmap and your region file (.rgn file).
![]()
Section 3: The INI File
![]() Step 10:
Step 10:
Open up any plain text editing software, Windows Notepad for example. And copy
and paste the following...
[skin]
image=
region=
draw=
Now you need to fill in the 3 parts.
For image you need to simply type the filename of the bitmap you have made,
for example gba.bmp.
For region you need to type the filename of the .RGN file, for example gba.rgn.
For draw you need to type the co-ordinates of the pixel where your screen on the
bitmap will start (noted down earlier hopefully!). And then the size of your
screen (also noted down if you followed the tutorial), seperate the 4 number
values by commas. Here is an example...
[skin]
image=gba.bmp
region=gba.rgn
draw=119,52,192,124
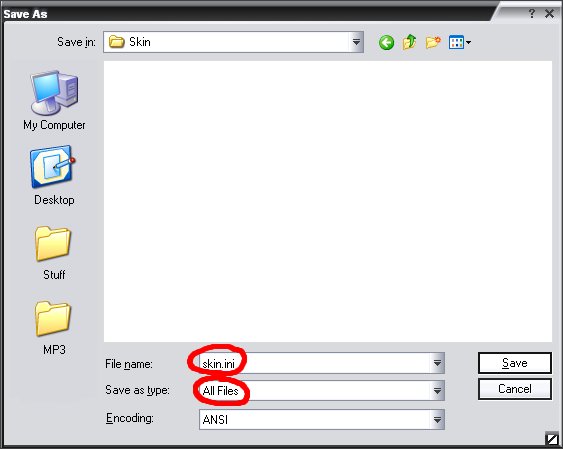
Now save the text as an INI file named as anything. When saving, under 'Save as Type' select "All Files" and end your filename with .ini.
![]()
Section 3: Finished!
![]() Step 11:
Step 11:
Now move the bitmap, the region file and the new ini file to the same directory.
And load your INI file in Visualboy Advance 1.5+ and test it! If all works OK,
then you are done! Pack your skin into a ZIP and send it to us! ;)
![]()
Thanks to Dreamer for the basic tutorial this was based on and images!